
Day after day, our Cyber Incident Response Team (CIRT) detects the threat vectors bad guys use to infiltrate organizations. This post will walk through a malware infection that used the Microsoft Sysinternals tool PsExec to attempt lateral movement, host reconnaissance, and network reconnaissance. We’ll show how the OODA loop method can help improve detection speed and accuracy—not only as the threat unfolded, but as our detection engineers reviewed the event activity after the breach had been stopped.
For those who aren’t familiar, the OODA loop is a strategic military concept which proposes that you can win an attack by going through the following four stages faster than your opponent: Observe, Orient, Decide, and Act.
Let the battle begin!
Stage 1: Observe
Our story begins on a Sunday afternoon, when activity on a customer endpoint triggered a detector designed to look for instances of renamed PsExec. Our detection engineering team had developed this detector because we’d observed numerous occasions of adversaries renaming their tools to evade detection. PsExec has many legitimate use cases, but we all know that just because a tool is typically used for a good cause doesn’t mean it can’t be used for evil. It has been adversaries’ go-to tool for lateral movement in a number of past breaches.
First, our CIRT observed the following attack event:
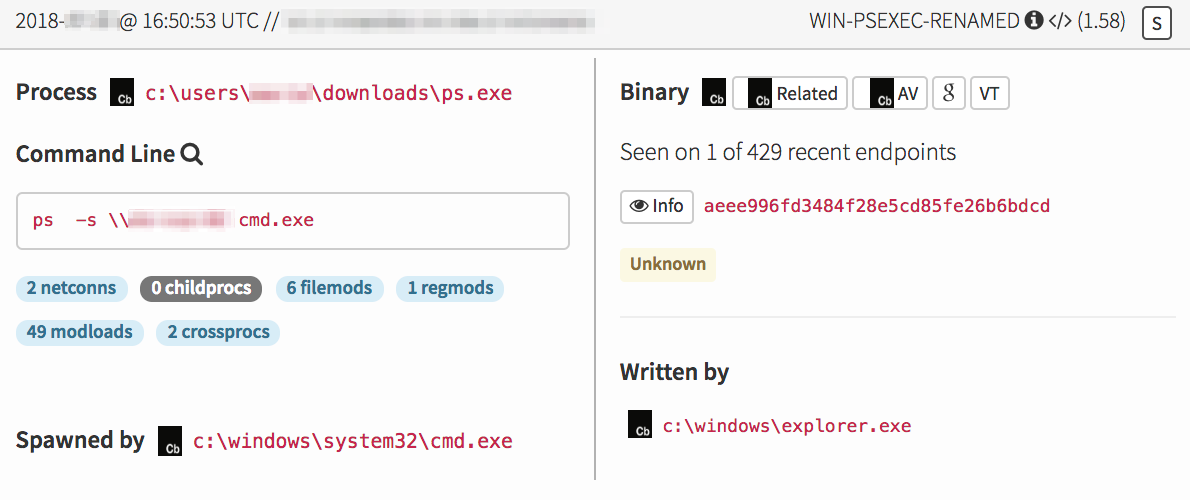 This was interesting because a user appeared to have executed a renamed copy of PsExec from the downloads folder. The user followed this action by attempting to launch a remote shell on another machine.
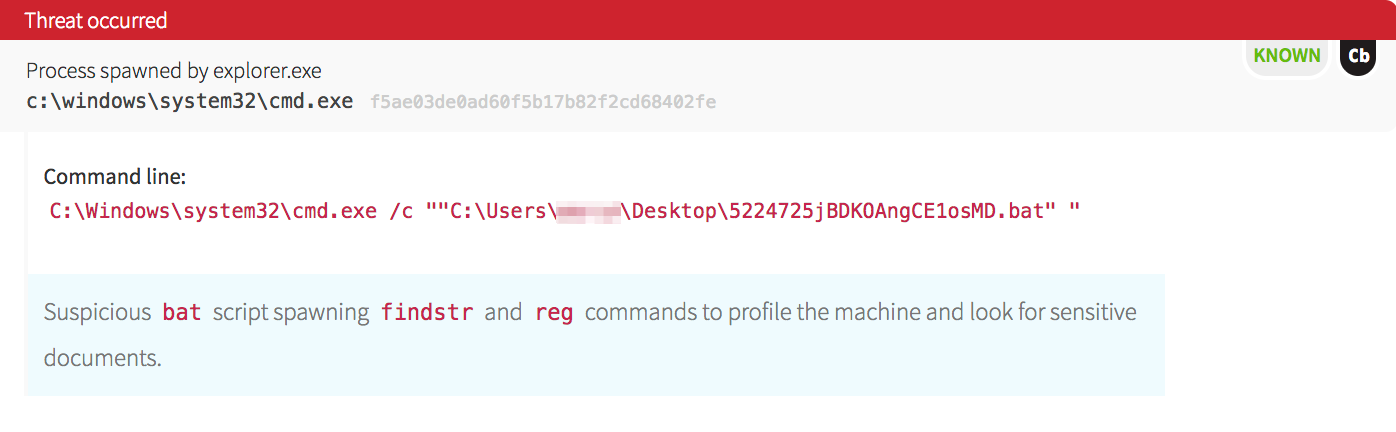
As we dug into the timeline, we noticed that this was not the first item of interest. We saw that a highly suspicious batch file was launched from the user’s desktop.
Malware often spreads laterally in a network very quickly by either dropping binaries to disk or using existing commands (think “living off the land”). In this case, the malware dropped a copy of PsExec, abusing the legitimate tool for evil purposes.
Hunting for PsExec with network data is often difficult because of its high utilization. The only way to find its true intention is to see what commands were launched on the target device, and what spawned PsExec in the first place. Even with endpoint data, it takes a broader context to observe the original intent.
Stage 2: Orient
Now that our CIRT had made the initial observation, it was time to gather intel and orient ourselves.
At this point, we knew that a remote shell had been attempted on another system. Our next question was: Where did this binary come from? After investigating this chain of events further, we noticed that the same batch file that launched PsExec also initiated a combination of domain and network reconnaissance processes.
Let’s take a look at some of the registry values that were written. Below are some examples of the reg.exe commands executed on the victim machine.
REG QUERY "HKEY_LOCAL_MACHINE\Software\Microsoft\Windows NT\CurrentVersion" /v ProductName
REG QUERY "HKEY_LOCAL_MACHINE\SOFTWARE\Microsoft\Windows\CurrentVersion\Uninstall\IEData" /v DisplayName
REG QUERY "HKEY_LOCAL_MACHINE\SOFTWARE\Microsoft\Windows\CurrentVersion\Uninstall"
REG QUERY HKEY_LOCAL_MACHINE\SOFTWARE\Microsoft\Windows\CurrentVersion\Uninstall\
REG QUERY "HKEY_LOCAL_MACHINE\SOFTWARE\Microsoft\Windows\CurrentVersion\Uninstall\Sophos Endpoint Defense" /v DisplayName
Observing these commands posed several questions in terms of detection, including:
- Are these specific commands typically run within this environment?
- How often does just
reg.exelaunch? - What binaries in this environment spawn
reg query? - Do these endpoints even run Sophos?
Network Reconnaissance
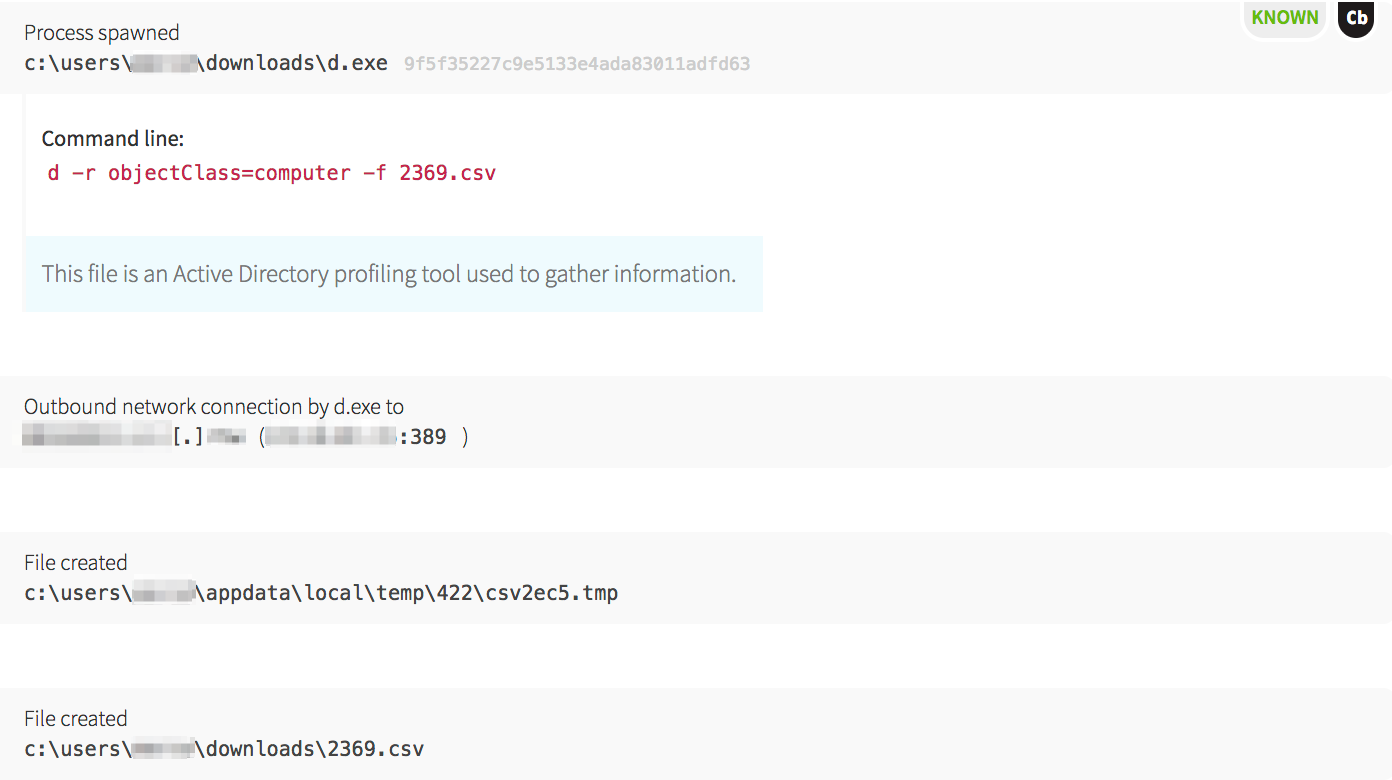
Before PsExec launched, the malware compiled a list of hostnames and accounts to start lateral movement by dropping a legitimate Windows binary that was renamed to d.exe. This tool is normally named csvde.exe on Windows servers that have the Active Directory Lightweight Directory Services server role installed. Its main use is to import and export Active Directory information using a CSV format.
The malware utilized this tool to pull all the computer objects from Active Directory. With the information supplied in computer objects, it had a way to iterate through each machine to test access.
 The malware dropped another binary,
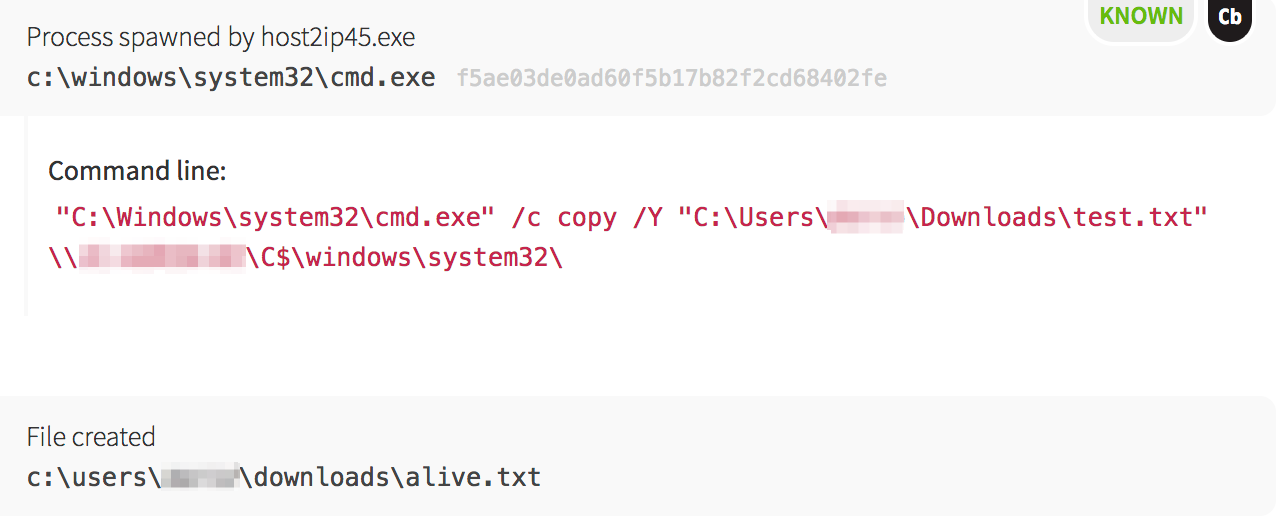
 host2ip45.exe, which checked if the hosts were alive. Based on the text filenames, the malware was able to quickly find its next target.
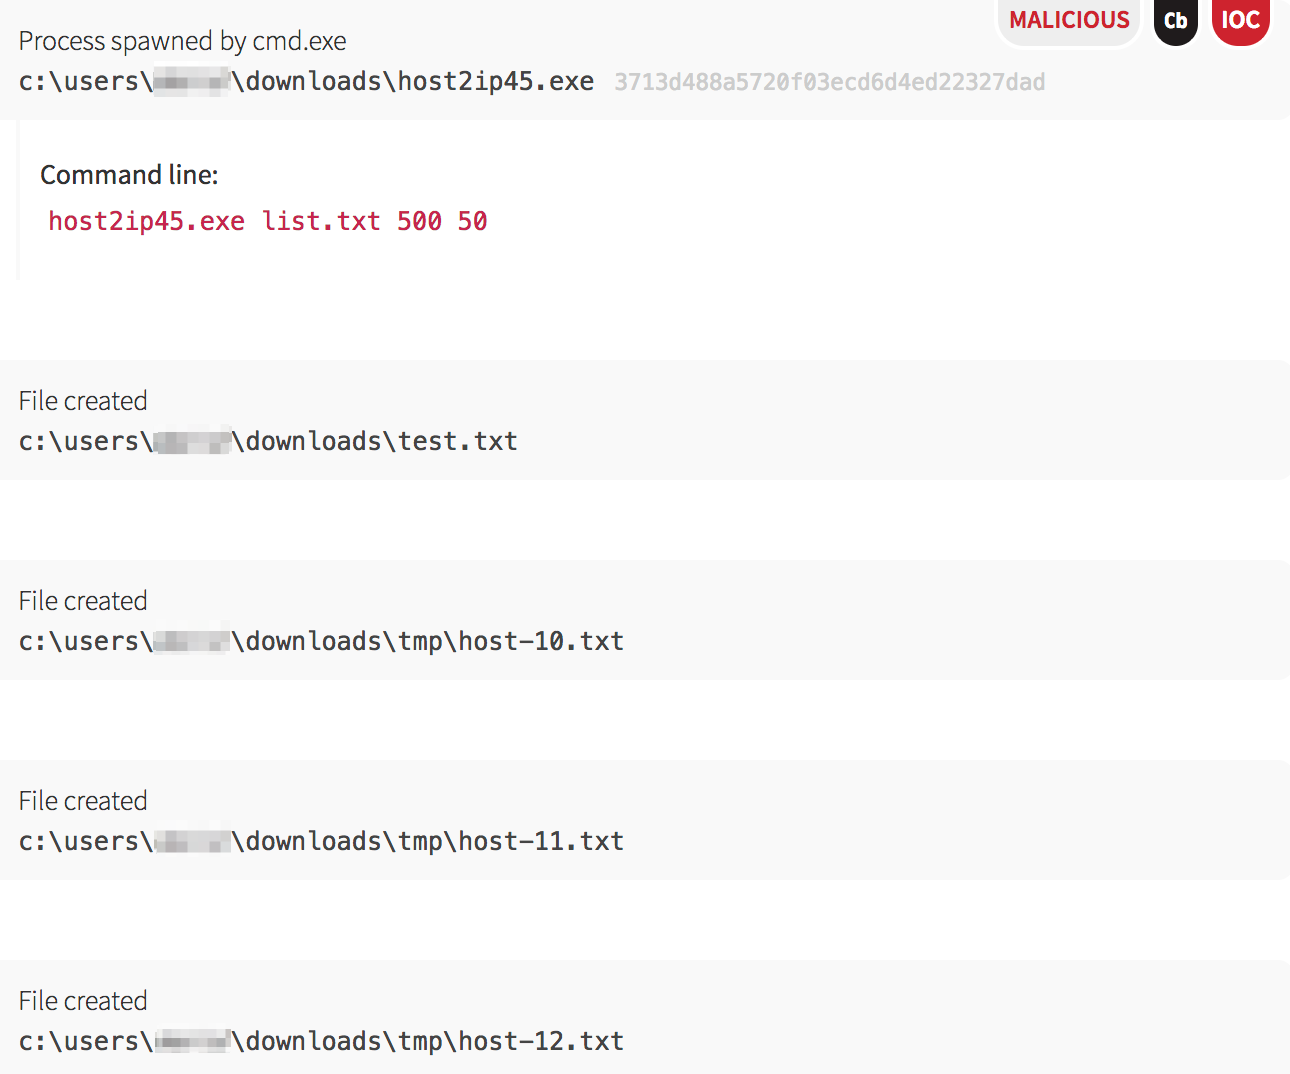 Now that the malware had hostnames and IP addresses from the
 host2ip45.exe binary, the malware attempted to find the easy route, which was via open and writeable network shares. Using the copy command, it tested whether each machine had an accessible network share.
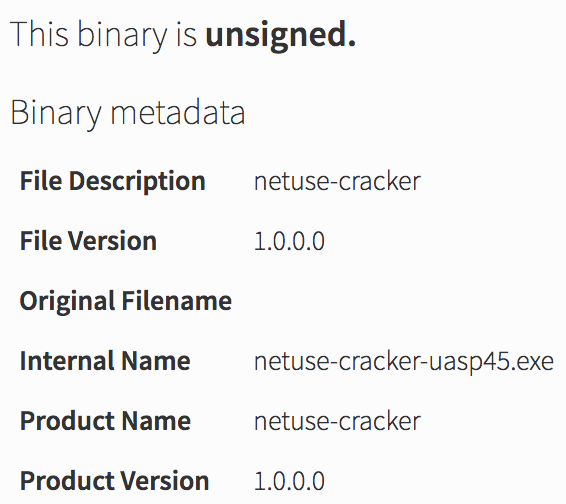
 Lastly, the malware downloaded another binary designed to brute-force network accounts against the domain controller. The binary’s metadata hinted that it used the net command to crack passwords.
 The malware tried to map the drive of the domain controller with commonly used passwords.
 The image below shows some of the brute-force command line arguments that were used.
 Host Reconnaissance
 Host Reconnaissance
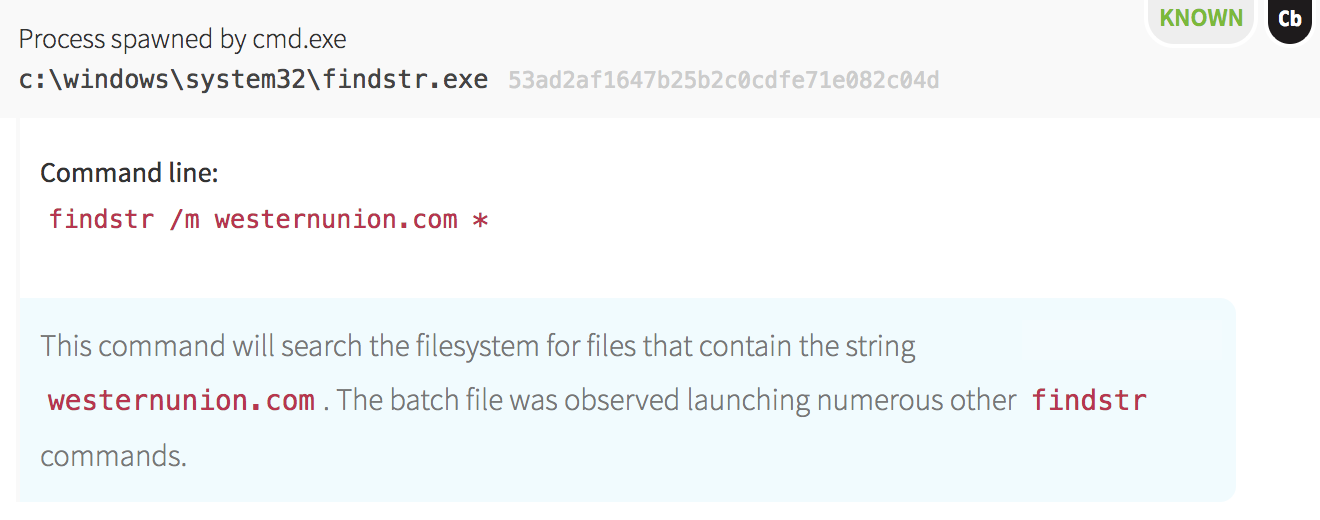
Not only did this initial batch file spawn processes related to network and account reconnaissance, it also scanned for strings related to financial and social networking websites, a technique commonly observed in attacks associated with information theft. The malware used the findstr command in Windows to print filenames containing specific strings, such as “paysurfer”, “paypal” and “coinbase”, as seen in the format of the following screenshot.
Stage 3 & 4: Decide & Act
At this point, we had a high degree of certainty that an active breach was underway. Detection engineering alerted incident handling, who quickly informed the customer that a critical severity detection was on the way.
The detection engineering team completed the writeup of observations and published the detection while the incident handler helped coordinate swift remediation actions according to the customer’s incident response playbook.
Repeating the Loop to Improve Speed & Accuracy
The story doesn’t end there. The detection engineering team assesses every detection sent to customers on the grounds of speed and accuracy. We look at whether or not we could have detected the activity more quickly and work to make improvements for the next time. One way we can improve is by developing automated detectors that help us process massive amounts of data and find threats faster.
With malware infections such as this one, we are primed to start testing. Let’s walk through the detector process, again taking an OODA loop approach.
Stage 1: Observe
This malware was pretty robust in terms of its automation and reconnaissance techniques. In this infection alone, it included some automated actions like lateral movement, host reconnaissance, and network reconnaissance. For each of these stages, we assessed whether or not we could make new detectors.
Stage 2: Orient
As blue teamers, we know that high-fidelity detection techniques are like gold. If those techniques are narrow in focus, we risk missing activity; if we broaden the scope, we risk significant increases in noise. However, if we shift the focus to creating more detectors designed to capture potential threats from different angles, then we may be able to balance out that risk. With this detection, we noticed some new detection techniques that would be viable going forward.
Taking the technique of tools being renamed as an example, it was valuable to look at characteristics of the execution chain that are unique. Certainly having the d.exe (csvde.exe) binary executed on a machine that was not a Windows server would be pretty uncommon, especially for non-administrators. Another idea was a static analysis approach where we would look at some of the metadata that Carbon Black (the endpoint sensor used in this case) was able to capture.
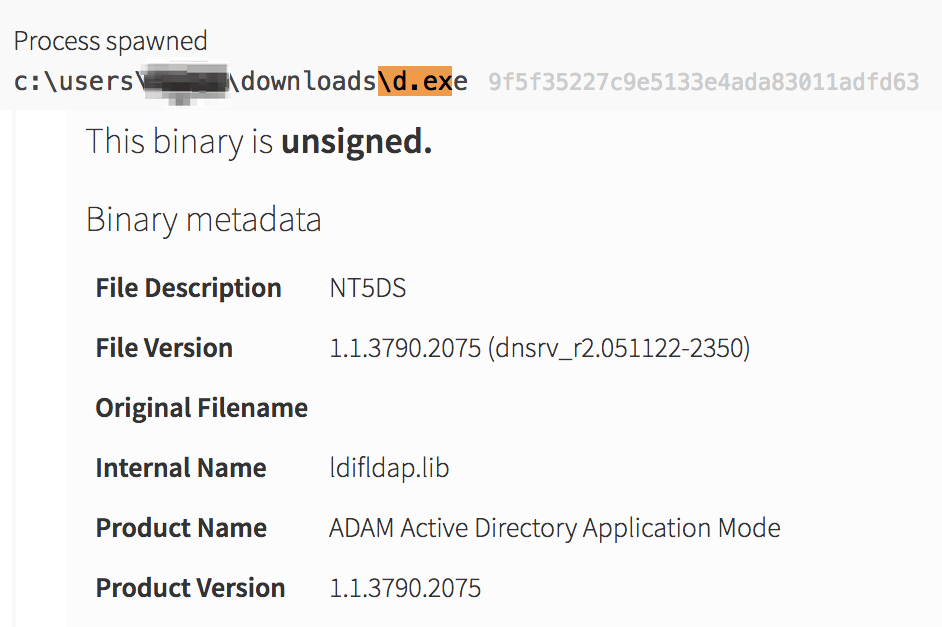 Since this malware infection was first discovered by our renamed PsExec detector, it was possible that another detector looking for renamed tools would also provide value. One option would be to check for an internal name equal to
 ldifldap.lib, and the process name not equal to the normal process name of csvde.exe.
Stage 3: Decide
This new detector sounded like it would work for us. How often would a server administrator actually need to rename a windows binary during their day-to-day operation? Our initial thought was that, just like renaming PsExec, it would almost never happen.
A quick search across our customers’ Carbon Black instances helped us decide whether or not this would be a viable detector. The results for a query such as: (internal_name:ldifldap.lib OR internal_name: csvde.exe) AND -process_name:csvde.exe turned out to be unique to this infection.

Stage 4: Act
One hit across all of our customers and it was a true positive; that sounded like a great idea for a new detector. As we’ve detailed in a previous blog on our detector development process, before deploying a new detector, we needed to undergo our typical development and testing processes. The final code to go live into our platform would look something like:
detects do
windows? &&
process_name? &&
process_name_not_equal_to?(['csvde.exe']) &&
( internal_name_downcased == 'ldifldap.lib' ||
internal_name_downcased == 'csvde.exe' )
Key Takeaway for Defenders
Enterprise defenders are always looking for the newest, shiniest, easiest, and greatest detection technology. Instead, it’s important to take the time to really make sure that they are utilizing their tools, people, and technology to their maximum potential. Reanalyzing incidents like the one above is how we improve as defenders. Why collect all of this information and let it sit idle in the corner without making it work for you? Defenders should remain vigilant and constantly ask their data tough questions.
The Red Canary detection methodology is one of continuous improvement. We hope your team and the community as a whole can benefit from learning about the threats we find. Feel free to let us know if you have comments or questions!
To take a deeper dive, watch an on-demand webinar with CEO Brian Beyer: Opening the Floodgates: How to Analyze 30+ TB of Endpoint Data Without Drowning Your Security Team
Related Articles
Identity, browsers, and node.js: Everything you missed in the Threat Detection Report miniseries